Mastering the Panoramic Easter Egg SVG for Stunning 3D Paper Crafts
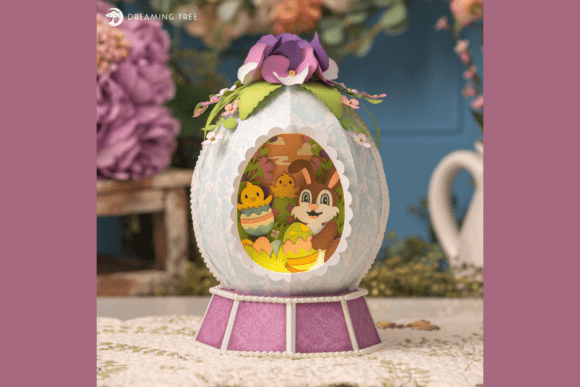
There is a distinct charm in vintage sugar eggs that modern plastic decorations simply cannot replicate. Bringing that nostalgia to life through paper crafting offers a rewarding blend of creativity and tradition. The Panoramic Easter Egg SVG is designed specifically to help you recreate this magic, featuring a charming interior where an Easter bunny and chicks nestle among delicate flowers and pearls. However, diving into 3D paper projects without a clear understanding of the file requirements and assembly nuances can lead to frustration rather than the stunning centerpiece you envision.
This design is more than just a cut file; it is a layered experience. With layered panels that pop with color and dimension, the final result relies heavily on how you interpret the digital instructions and select your materials. Whether you are a hobbyist looking for a weekend project or a small business owner aiming to create unique keepsake gifts, understanding the intricacies of this specific SVG format is crucial for success.
Understanding the File Format and Compatibility
One of the most common misunderstandings crafters face involves file expectations. When you acquire the Panoramic Easter Egg SVG, you are receiving a vector file intended for cutting machines, accompanied by a PDF legend. A frequent mistake is assuming the download includes pre-colored raster images or ready-to-print sheets. This file is designed for use with SVG-ready cutting machines and software, meaning you are responsible for assigning colors to layers based on the provided legend.
If you attempt to print this directly from a design software without mapping the layers to specific cardstock colors, the dimensional effect will be lost. The beauty of this project lies in the physical layering of different paper shades to create depth. To avoid wasting material, always review the PDF legend before sending anything to your cutter. This document acts as your roadmap, detailing which parts correspond to which hues, ensuring that the "Glacier Melt" sections don't end up cut from "Jet Black" cardstock by accident.
The Critical Role of Paper Selection
The supply list for this project is specific for a reason, yet many crafters overlook the importance of paper weight and texture. The design calls for various sheets, including 12x12 Glacier Melt Cardstock and smaller 8.5x11 sheets in colors like Grasshopper, Chartreuse, and Dutch Iris. A typical error is substituting standard printer paper or lightweight scrapbook paper for the recommended cardstock.
Because this is a 3D structure with finished dimensions of approximately 9 inches high by 5 inches wide and 5.5 inches deep, structural integrity is paramount. Lightweight paper will cause the egg to collapse or lose its rounded shape, ruining the panoramic effect inside. Conversely, using cardstock that is too thick without adjusting your machine's pressure settings can lead to incomplete cuts, forcing you to weed details manually and risking tears in delicate areas like the flower petals or the bunny's ears.
Better Approach: Stick closely to the recommended cardstock weights (usually between 65lb and 80lb). If you wish to use bold patterns instead of the suggested pastels to match your spring décor, ensure the pattern scale is appropriate. Large, busy prints can overwhelm the small, intricate details of the chicks and pearls, making the design look cluttered rather than charming. Solid pastels often yield the most professional-looking results for this specific style.
Navigating Dimensions and Resizing
Flexibility is a hallmark of SVG files, and you can resize the Panoramic Easter Egg SVG to fit your needs. However, resizing introduces a set of challenges that beginners often underestimate. The original design is optimized for 12x12 cutting mats. If you scale the project down significantly to make miniature favors, the intricate tabs and slots used for assembly may become too small to fold or glue effectively.
On the other hand, scaling up too much without increasing the paper weight can lead to a fragile structure that cannot support its own span. The interplay between the height, width, and depth is engineered for stability at the default size. If you must resize, do so incrementally and test a single section first. Remember that the step-by-step video tutorial included with the purchase is based on the standard dimensions; deviating from these means you will need to adapt the folding and gluing techniques shown in the guide.
Assembly Pitfalls and How to Avoid Them
Even with perfect cuts, the assembly phase is where many projects stall. The Panoramic Easter Egg relies on precise folding scores and adhesive placement. A common oversight is ignoring the score lines or scoring them on the wrong side of the paper. Since the design uses multiple layers to create the 3D pop, folding a panel inward instead of outward can invert the entire perspective, hiding the cute bunny and chicks inside the shell rather than displaying them.
Another frequent issue is adhesive choice. Using wet glue on thin cardstock can cause warping, while heavy-duty tape might add unwanted bulk that prevents panels from closing flush. For best results, use a fine-tip liquid glue for small tabs and double-sided tape for larger structural seams. Work slowly and allow each layer to set before adding the next. Rushing this process often leads to misalignment, where the egg halves do not meet evenly at the center seam.
Checklist Before You Start Cutting
To ensure your project proceeds smoothly and yields a high-quality keepsake, run through this quick verification list:
- Verify Software Compatibility: Ensure your design software can import SVG files and that you understand how to ungroup and recolor layers.
- Review the Legend: Match your physical cardstock inventory against the PDF legend to confirm you have the correct shades like Lemon Twist, Mandarin Orange, and Rosy Cheeks.
- Check Mat Adhesion: Since the design includes small, delicate pieces, ensure your cutting mat has enough stick to hold the paper firmly during the cut cycle.
- Watch the Tutorial: View the included step-by-step video tutorial in its entirety before making your first cut to understand the sequence of assembly.
- Test Cut: If you are trying a new brand of cardstock or have resized the file, perform a test cut on a small section to verify pressure and blade depth.
Creating a Panoramic Easter Egg SVG project is a delightful way to celebrate the season with a touch of handmade elegance. By paying attention to material choices, respecting the limitations of resizing, and following the assembly logic provided in the legend and tutorial, you can avoid common pitfalls. The result is a breathtaking display of craftsmanship that captures the spirit of spring, ready to serve as a cherished centerpiece or a thoughtful gift that stands out from store-bought decorations.